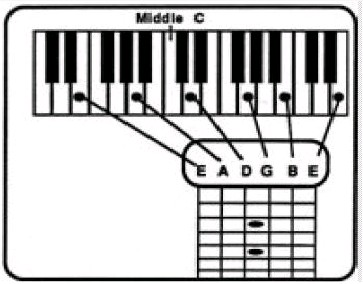
Men-stem merupakan gitar merupakan hal yang sangat penting dalam permainan gitar. Men-stem gitar adalah mencari atau menyocokkan bunyi nada nada pada senar-senar gitar. Karena apabila gitar tidak stem, maka bunyi yang dihasilkan tidak akan bagus atau fales. Oleh sebab itu untuk memainkan gitar kita perlu menyetem gitarnya dahulu agar suaranya tidak fales.
Ada beberapa cara untuk menyetem gitar, yaitu :
A. Dengan menggunakan pendengaran
Dalam menyeten gitar biasanya hanya menggunakan pendengaran saja. karena cara ini cara yang praktis dan mudah tetapi membutuhkan feeling yang kuat, caranya sebagai berikut:
1. Stem dulu senar nomor. 1 jangan terlalu kencang dan jangan terlalu kendor. 2. Apabila senar nomor. 1 sudah stem, maka pada nada senar dua dengan ditekan pada kolom 5 lalu disamakan suaranya dengan senar no.1 yang tidak ditekan (los). 3. Senar no3 dibunyikan pada kolom ke 4 yang nadanya disamakan dengan nada senar no 2 yang tanpa ditekan (los). 4. Senar no 4 dibunyiakan pada kolom ke 5 dan di samakan dengan nada senar no 3 yang dibunyikan tanpa ditekan (los). 5. Senar no 5 dibunyikan pada kolom 5 dan di samakan nadanya dengan nada senar no 4 yang di los. 6. Senar no 6 dibunyikan pada klom 5 dan disamakan bunyinya dengan nada senar no 5 yang di los.
B. Dengan alat musik lain
Ada pula yang menggunakan alat musik lain (piano/ organ) dalam menstem gitar yang tidak sesuai nadanya menyetarakan nada gitar dengan alat musik yang lainya, seperti:
Menyamakan senar no 1 pada nada E
Menyamakan senar no 2 pada nada B
Menyamakan senar no 3 pada nada G
Menyamakan senar no 4 pada nada D
Menyamakan senar no 5 pada nada A
menyamakan senar no 6 pada nada E
C. dengan peluit tala
Menstem dengan peluit tala yaitu dengan menyamakan nadanya saja, yaitu dengan cara mengurut dari nada tertinggi ke yang paling rendah dan pada gitar senar no 1 sampai no6.
Holiday
Last week holiday, my friend and I went to Yogya.
we traveled there by bus. We departed at 5 am and
arrived there at 3pm. We spent the night at the hotel
near Yogya palace. At night we took a walkto enjoy the city. In the morning we went to parang tritis
beach. After that we visited palace and we went
to kaliurang at 5.30 am. We enjoyed fresh air and
a beautiful scenery. After that, we went home, in the
middle of our trip. We visited prambanan temple.
Studied together
Last week, my friends and I studied together
in wong deso's house. we discussed about mathe
matics lesson, because we had a difficulties to
understaind it. We studied for 2 hours and enjoyed
food and drinks in wong deso's house.
Descriptive text adalah text yang menceritakan seseorang,idola atau hewan.
the steps:
Identification
Description
habit
habitat
characteristics
simple present
adjective
purpose=to tell something
example:
Lion
This animal is a Lion. it has a big body.
four strong foot,and sharp claws. This animal
can kill the other animals and human. it lives in
the jungle and eats meat.
Horse
This animal is a horse. it has a big body.
strong foot and long tail. This animal can
run fast and follow horse race. It lives in the jungle and
eats grass. This animal is close with human.
Rhinocerous
This animal is a Rhinocerous. it has a big body
and strong. sharp horns, four strong legs, and short
tail. This animal can destroy a think with it horns.
It lives in the jungle and eats.........
Karya tulis adalah sesuatu karya yang di tulis untuk membuat sesuatu yang berguna bagi orang lain termasuk penulis tersebut. adapun susunan karya tulis yang baik adalah sebagai berikut:
-BAB I latar belakang tujuan manfaat rumusan masalah metode -BAB II pembahasan pembahasan di sini meliputi pengertian,cara mengatasi masalah,dll. -BAB III kesimpulan dari pembahasan di BAB II saran anda.
Dan yang terakhir adalah daftar pustaka "semoga dapat berguna bagi anda yang membacanya".
1.A variety of vegetables (onions, carrots, celery,
tomatoes, broccoli, mushrooms, etc.)
2.Your choice of seasonings (salt, pepper, garlic, bay leaves, etc.)
Water
Steps:
1. Place vegetables and seasonings in a large pot, and cover
with water.
2. Bring to a boil.
3. Reduce heat and simmer for at least an hour.
4. Then, strain out the vegetables, and your broth is ready
for use.
Tips:
Not sure which vegetables to include in your broth. Here's
what each will contribute:
# Tomatoes - acidity and color
# Mushrooms - meatiness
# Carrots, corn - sweetness
# Potatoes - body
# Cabbage, celery, broccoli, green beans - earthiness
# Onions, garlic - a slight spiciness
2.Vegetable scraps and peels make great broth. Keep a
container in your freezer for all those odds and ends, and
you'll always have the makings for cheap and tasty vege
table broth.
Freeze broth in ice cube trays; then pull out cubes when
you need them. Two cubes equal a quarter cup of broth.
How to make a guitar
Materials :
mahogany board – 2 meters
handsaw
band saw
chisel
hammer
mechanical drill
wood glue
tape measure
file
sandpaper
varnish
paper
pencil
guitar strings
1 bag of nuts and bolts
plastic tuners
steps :
Mahogany is Your Best Choice
To create your own guitar, your logical first step is to select the right materials. If you frequent music stores, you will notice that acoustic guitars are made from various materials. Some top quality guitars have hardwood bodies that make them sound a bit different from other guitars. In your case, mahogany is your best choice since you do not have the standard set of equipment that a guitar-maker has. Mahogany guitars sound almost as good as their hardwood counterparts and they are a whole lot easier to work with. Besides, it is also much cheaper than any hardwood.
Guitar-Making Tools
Go to a lumber shop and order a two-meter mahogany board. Handpick the smoothest board among the bunch then make your way into a hardware center to gather the necessary tools that are not found in your home’s toolbox. Once done, grab a can of varnish and wood glue then go to a music store to purchase the guitar strings and tuners.
The Guitar Guide
Before you start creating the guitar, sketch the design of your guitar on a sheet of paper so that you have a guide. You can go for the standard guitar if you are a traditional guitar player, the lefty guitar if you are left-handed or a different-shaped guitar if you are an unconventional guitar player. Do not forget to indicate the dimensions of each section of the guitar in the sheet of paper to make things easier.
From Board to Guitar
When you have settled on a design for your guitar, outline its shape on the mahogany board with a pencil. You can refer to your guide from time to time so that your measurements will be accurate. Once done, use a handsaw to cut out the neck and a band saw for the guitar’s body. Continue this process until you have all the wooden pieces needed to assemble your guitar.
The Guitar Neck
Get the neck of your guitar and make the nineteen equidistant frets on its surface. Use your hammer and chisel to etch out the borders of each fret. Do this carefully since a slight error can alter the sound and the tuning of your guitar. When you are done with the guitar frets, you can drill the guitar’s head stock and affix the tuners with your mechanical drill. Lock all six tuners with nuts and bolts to finish the neck of your guitar.
The Guitar Jigsaw Puzzle
At this point, think of your guitar as a jigsaw puzzle that you will connect with wood glue. Assemble the wooden pieces according to the shape and dimensions that you sketched in your guide. Apply just enough wood glue so that the sound of your guitar will not be adversely altered. When you are done, the only remaining step is the guitar finish.
The Guitar Finish
Use a wood file and a sheet of sandpaper to smoothen the surface of the guitar. When your guitar is smooth, apply varnish to the guitar’s body and neck so that your guitar will have a beautiful glossy finish. Your guitar will be ready for your melodies and symphonies once the varnish dries.
Now, you can hear how your self-made guitar responds to all your Steve Vai impressions and your Joe Satriani moments. With enough practice and determination, your name might actually stand alongside those two. Go and play your guitar.
How to make bamboo flowers
materials:
# 1 bamboo pole, 30 to 40 centimeters long;
# 1 bottle glue; and
# 1 piece vase.
# a bolo;
# a saw;
# a knife; and
# a brad awl.
steps:
1) Look for bamboo splints 30 to 40 centimeters long. Remove the outer portion on the side of the epidermis. Use a knife to remove the outer portion.
2) Prepare a round bamboo splint to a diameter of 6 millimeters.
3) Bore a pilot hole 4 millimeters deep at the center of one end of the bamboo dowel. Use a brad awl.
4) Taper the end of the bamboo dowel where the pilot hole is.
5) Measure and mark off 6 centimeters from the tapered end.
6) Cut the petals starting from the 5 centimeter-mark.
7) Every time a petal is cut, turn the dowel counterclockwise.
8) Repeat step 7 until all of the bamboo dowels are cut into petals.
9) After cutting the petals, remove the pointed end of the bamboo by cutting.
10) Repeat steps 3 to 9 until the needed number of flowers are made.
11) Now prepare the stems. Use the outer portion of the bamboo splint in step 1 which tapers at the end.
12) Bend the stem slightly.
13) Apply white glue on the pointed end of the stem and insert the pilot hole of the bamboo.
14) Arrange the bamboo flowers in a ceramic or bamboo flower vase.
15) Evaluate your finished work by asking yourself these questions:
- Are the petals artistically shaped?
- Are the parts well-glued together?
- Are the flowers arranged on the vase following the principles of flower arrangement?
- Does the finished project have a pleasing appearance?
Artificial flowers, such as African daisies, can be made from bamboo splits. Bamboo flowers can serve as table decors and are marketable, too.
How to make a dress
Materials :
A sewing machine
Basic Knowledge of sewing
Fabric Marker (Called Tailor Chalk)
Pins
Thread (buy extra just in case)
Fabric (enough for your pattern plus extra incase you make a mistake)
Seam ripper
Fabric Scissors (sharper than regular scissors)
Sewing needle
Tape Measure
Steps :
Acquire a sewing machine. Takeing a sewing class and making a few things from the sewing machine, such as small pillows, Can help establish your confidence with sewing and teaches you the few basics you will need. Also, try to make something using a pattern to ensure you know how to use one.
Figure out what kind of dress you want: is it a shift dress, a ball gown, a tent dress, a party dress, with a sweetheart neckline, a straight neckline, straps, a tank top, pleated skirt, straight skirt, puffball, lantern or tiered skirt? Inspire yourself with pictures of movie stars you love.
Draw a rough sketch of the dress using colors. Try to make it as accurate as possible. If you are a bad artist, Google the type of dress you want.
Go to a fabric store and purchase fabric you will need and a pattern (if you are comfortable without a pattern you can make your own but this is tedious and can go wrong; otherwise it is recommended you purchase one.) Try to buy a pattern as close as possible to your drawing or picture, but always know that you can modify a pattern.
Begin cutting and sewing the basic pattern.
If you are making a dress with a fitted bodice, an easier way to make it than how the pattern shows you is to sew a rectangle piece of cloth (fitted to your torso) into a tube, pull it over your head, and pin darts (folds of the cloth to make it fit better).
mungkin anda sudah mengetahui apa itu musikalisasi itu. Musikalisasi puisi menurut saya adalah sebuah puisi yang telah dipasang nada dan dirangkai menjadi sebuah lagu. musikalisasi puisi bukanlah membaca puisi dengan diiringi dengan musik , pada dasarnya sebuah lagu itu adalah puisi , maka dari itu untuk membuat musukalisasi puisi tersebut , saya mempunyai tips for you
1. pertama yang sangat penting ada alat muziknya 2. Buatlah sebuah puisi bertemakan bebas 3. tentukan nada sesuai latar belakang puisi ( misalnya puisinya sedih ya... berarti nadanya harus sedih juga ......!) 4. jika telah selesai coba nyanyikan, apabila kurang variasi musiknya bisa ditambah ( apalagi ada melodinya.. ) 5. jika sudah ma'nyos tinggal nyanyikan aja.. ke temen you dan mintalah pendapat mereka.
jika anda kurang faham dalam penciptaan musikalisasi puisi bisa bertanya ke saya ke rahman.syaifudin9g@yahoo.com , insya ALLAH saya bisa bantu . thank you.......